Google Search Console is a fantastic tool for keeping an eye on and tweaking your website’s performance. It’s easy to access and incredibly useful.
The Search Console is free and packed with features. You can check out your eCommerce performance, dive into analytics, and get traffic insights. It’s a handy tool that can scale with any business size, thanks to its diverse metrics.
Getting started with Google Search Console might feel daunting for first-timers due to its complex features. But don’t worry! Once you get the hang of the basics, you’ll be navigating it like a pro in no time.
So, to help you get accustomed to the tool, here’s a comprehensive guide to how you can use it to optimise SEO performance and improve search rankings.
Want to receive updates? Sign up to our newsletter
Each time a new blog is posted, you’ll receive a notification, it’s really that simple.
Benefits Of Using Google Search Console
Being one of the most accessible free SEO tools on the internet, Google Search Console offers a suite of features that rival premium SEO software.
It’s a valuable asset whether you’re new to SEO or running a small business. Even for top-tier companies, it’s a great supplementary tool. Proper use of Google Search Console can really deliver results.
Here’s a brief list of the benefits of using the Google Search Console:
- Enabling tells Google to access your website content
- Track search performance
- Submit new website URLs for crawling
- Track and reduce security issues
- find out how Google sees your site
Adding Your Website To The Search Console
Step 1: Choose The Property Type
First things first, sign into your Google account with your domain and your domain name and use it to access the search console. If this is your first time logging in, you will be greeted by a “Welcome” message offering two property types: domain and URL prefix.
These are site verification methods, with URL prefixes offering a wider range of verification modes. Most people usually recommend choosing a URL prefix.
Step 2: Website Ownership Verification
Enter your website’s URL and perform a site verification to certify that you are the website owner. You can approach this in several ways, the most efficient being Google Analytics.
Google Analytics automatically verifies the website for you, cutting the complicated portions of the verification process short. The only additional step is to link your Google Search Console account to the Analytics account.
Click the “Admin” button in your Google Tag Manager dashboard, go to Property Settings and click the “Add” button under the Search Console Settings. After this, you can pick the Google Search Console and Google Analytics property types, wrapping up the linking process.
Once your site is verified, proceed to the next step or try something different if this method doesn’t work. Other options include DNS CNAME verification imported from the old Google Webmaster Tools.
Step 3: Adding A Sitemap
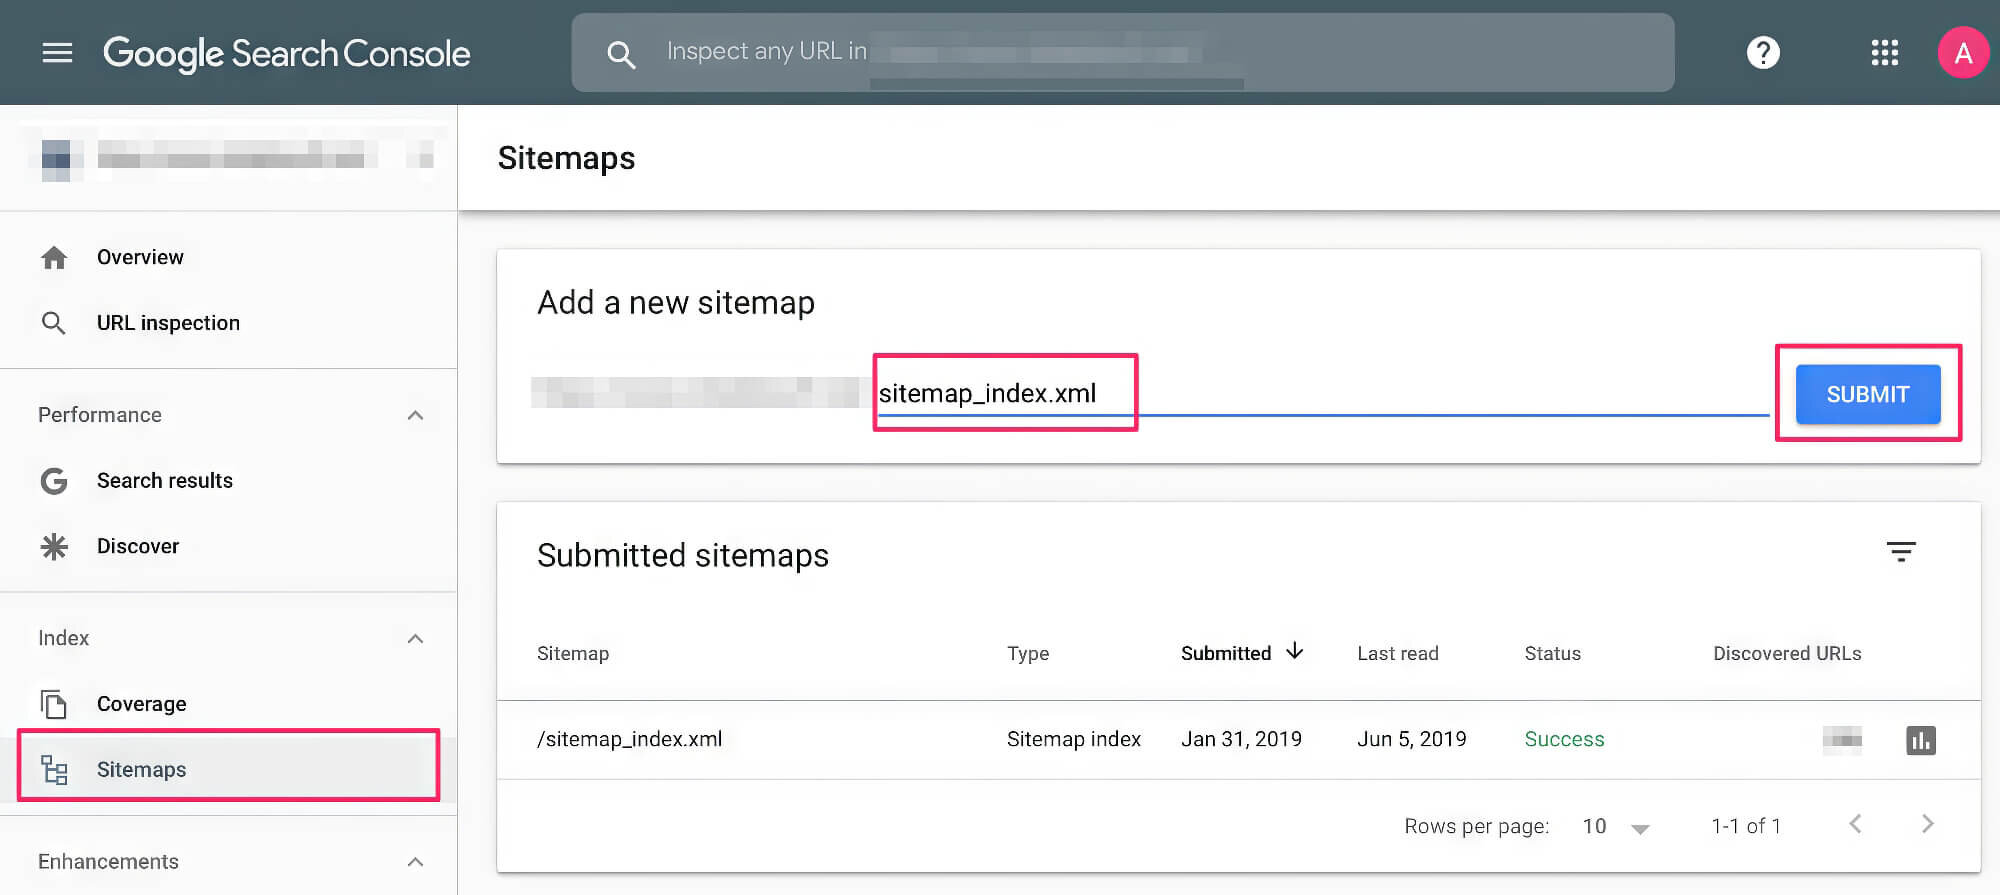
Next, prepare for an HTML file upload of your website’s sitemap if you have one ready. Typically, this is in the XML file format that provides the Search Console with information about your website’s pages. If your site already has one, you can find it at https://yourdomain.com/sitemap.xml.
But if you need to create a sitemap for your website, consider using XML sitemap tools like XML Sitemaps for this endeavour.
Alternatively, you can use the Google XML Sitemaps Plugin for websites supported by WordPress. Simply copy-paste the XML sitemap URL created by the plugin into the “Add a new sitemap” field in the Google Search Console.
Note that it can take several days before Google Search Console detects the information from your website.
Understanding The Data Provided By The Search Console
Google Search Console provides plenty of useful data that you can use to gauge the performance of your website quickly and accurately. The wide variety of options made available by the console can help you shape your future content strategy while providing insights into optimisation opportunities.
This data includes:
- Google Search Console Overview
- Performance Search Results
- Index Coverage Report
- Sitemaps
- Removals
- Core Web Vitals
- Accelerated Mobile Pages (AMP)
- External And Internal Links
- Manual Actions
- Mobile Usability
- Crawl Statistics
- URL Inspection Tool
- Tester (Robots.txt file)
- URL parameters
Let’s examine each data point in detail to see how you can make the most out of Google Search Console.
1. Google Search Console Overview
The Overview tab is the first you will see when you open the Google Search Console and access your website. Here, you will find a summarised version of all the data points provided by the console, represented in small tabs and graph charts.
Clicking on these will redirect you to their respective tabs, where the report shows a more detailed examination of the data. Alternatively, you can access these tabs through the sidebar on the left.
2. Performance Search Results
The performance report under Performance Search Results in Google Search Console gives you an overview of your website’s performance.
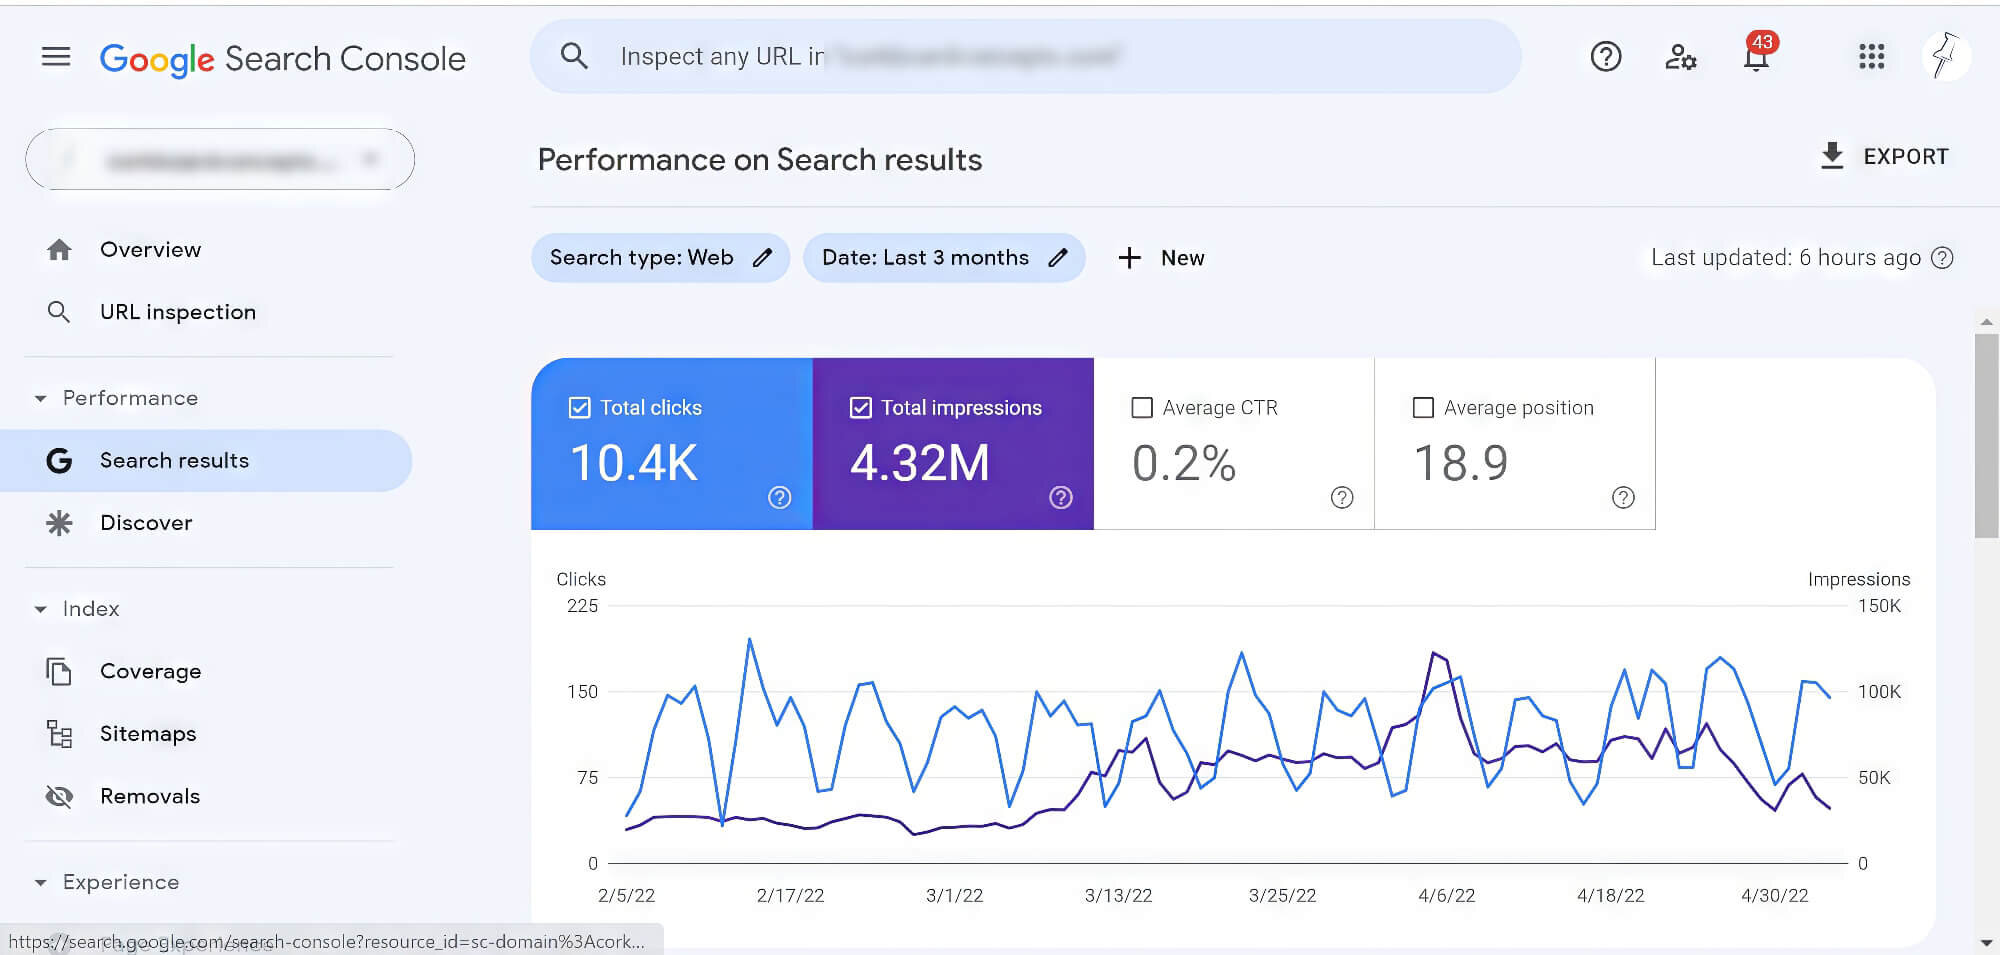
In this tab, you can view statistics like total clicks, impressions, average CTR, average click-through rate and average position. Located at the top of the page are filters to add or remove parameters. These filters can be invaluable to your marketing efforts, allowing you to refocus the SEO strategy as needed.
Listed below is a brief description of what each filter can show you:
- Clicks: Displays the number of clicks from SERPs
- Impressions: Shows the number of impressions or SERP results viewed by users
- CTR: The click-through rate, which is a clicks-to-impressions ratio
- Position: Displays the average position of the highest-ranking website page
In addition, the Performance Search Results tab has even more options that allow you to group the data in a certain way. Here’s a brief explanation of each of them:
- Queries: see a list of search queries that drove more traffic and enhanced the page experience of the website
- Page: Displays the specific pages that appeared in Google’s search results
- Country: Segregates data based on the users’ location
- Device: Segregates data based on the device used to search
- Search Type: Displays the search type made (web search, image search, etc.)
- Search Appearance for rich results: This lets you access special filters
- Date: Segregates data based on when the searches were made
3. Index Coverage Report
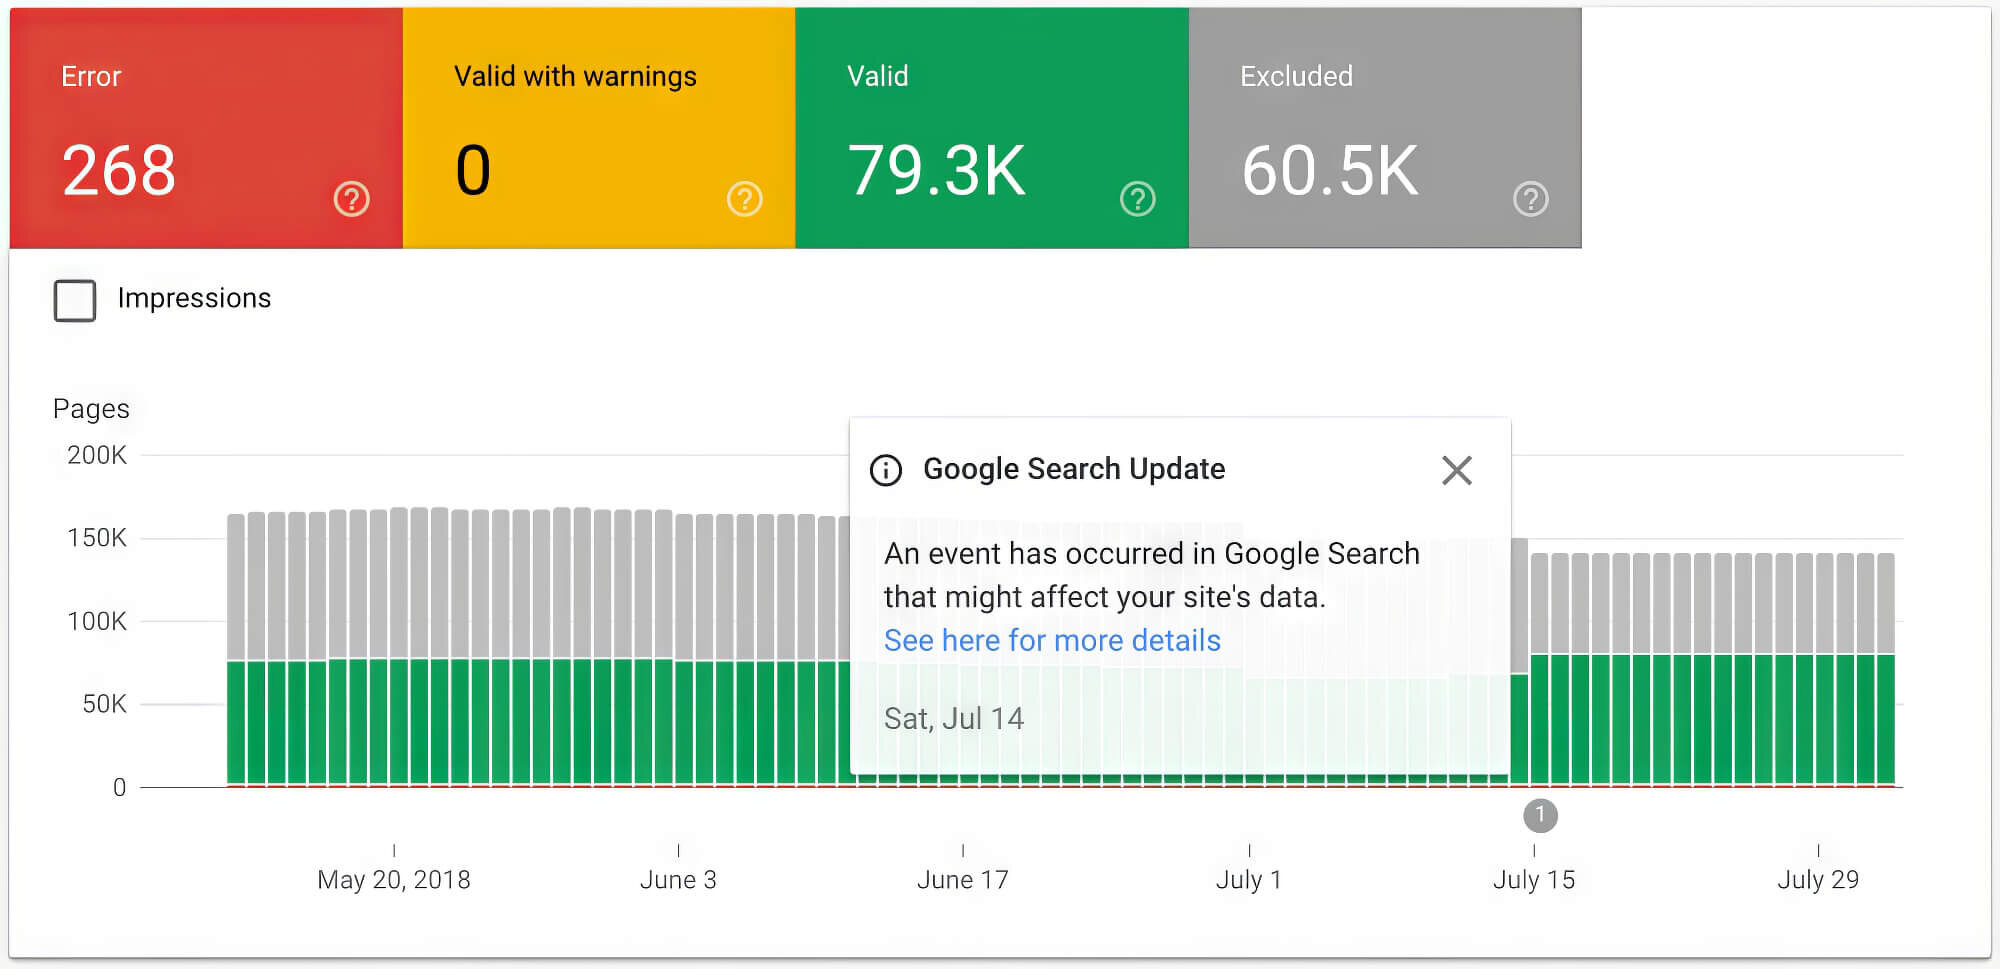
The Index Coverage Report is an overview of the index status, and URLs Google has indexed for the selected property type. It also includes any issues the search engine may have encountered in the process.
Google indexes each word its bot, Googlebot, finds on each page it processes on the internet, including content tags and attributes. Then, it creates a graph that breaks down the URLs on your web pages that the bot has indexed. As a result, it becomes more likely that your site’s content appears in a search result.
This report changes with time as you continue to modify the content of your website. Remember that the bot doesn’t include duplicate URLs or those without an index meta tag.
4. Sitemaps
Websites typically have a sitemap to make it easier for users to navigate the site content easily.
If your website includes one, consider checking whether the sitemap submitted in Google Search Console is the latest version. If not, simply download the latest version and add it to the console to refresh the number of submitted URLs.
You can also use the console to find out how the search engine reads your website and if all the pages are viewed as desired.
5. Removals
You can choose to exclude certain pages from the Google search results temporarily. There can be many reasons for this, including page updates, adding new content, excluding incorrect information, or creating a new page covering an identical topic.
URLs can be excluded for up to 90 daysbefore the removal effect expires. So, if you need to remove a page entirely, you must do so directly from the website.
6. Core Web Vitals
Core Web Vitals is a Google effort to provide developers and users with specific metrics to gauge a website’s user experience.
In essence, Core Web Vitals is a toolset available to all website owners that they can use to improve or break down a website visitor’s experience. The toolset prioritises three key user experience criteria: user-friendliness, site speed, and web page stability.
Every year, the metrics used for Core Web Vitals are updated, impacting websites differently based on user experience and engagement. Since technical SEO prioritises Core Web Vitals over other metrics, it is a pillar that every website owner must adhere to. After all, these metrics determine the success or failure of a web page.
The primary metrics included in Google Core Web Vitals are:
- Largest Contentful Paint (LCP):Checks the loading speed of a web page
- Cumulative Layout Shift (CLS): Tracks the movement of web page elements
- First Input Delay (FID): Measures the user’s interactivity with web page elements
Consider also being mindful of a few secondary metrics that are not part of the Core Web Vitals. By tracking these non-Core Web Vitals metrics, your website’s UX will only improve.
These non-core metrics include the following:
- First Contentful Paint (FCP): Measures the loading time of the first block of site content
- Speed Index (SI): Measures the time taken by a website to display the content
- Time To Interactive (TTI): Measures the loading and interactivity time of site elements
- Total Blocking Time (TBT): Measures the time between FCP and TTI
- Page Performance Scores: An aggregate score of all the metrics listed above

7. Accelerated Mobile Pages (AMP)
Accelerated Mobile Pages (AMP) is all about ensuring your mobile site loads quickly. This is particularly beneficial for users with slower internet connections, helping them access your site without hassle.
You will need some coding knowledge to create AMPs since it gives you access to a few lines of modifiable code. But if you are new to it, a guide to Google AMP exists to help you create them for your website from scratch.
You can enable the AMP setting from the enhancements section of the Enhancements tab in Google Search Console.
8. External And Internal Links
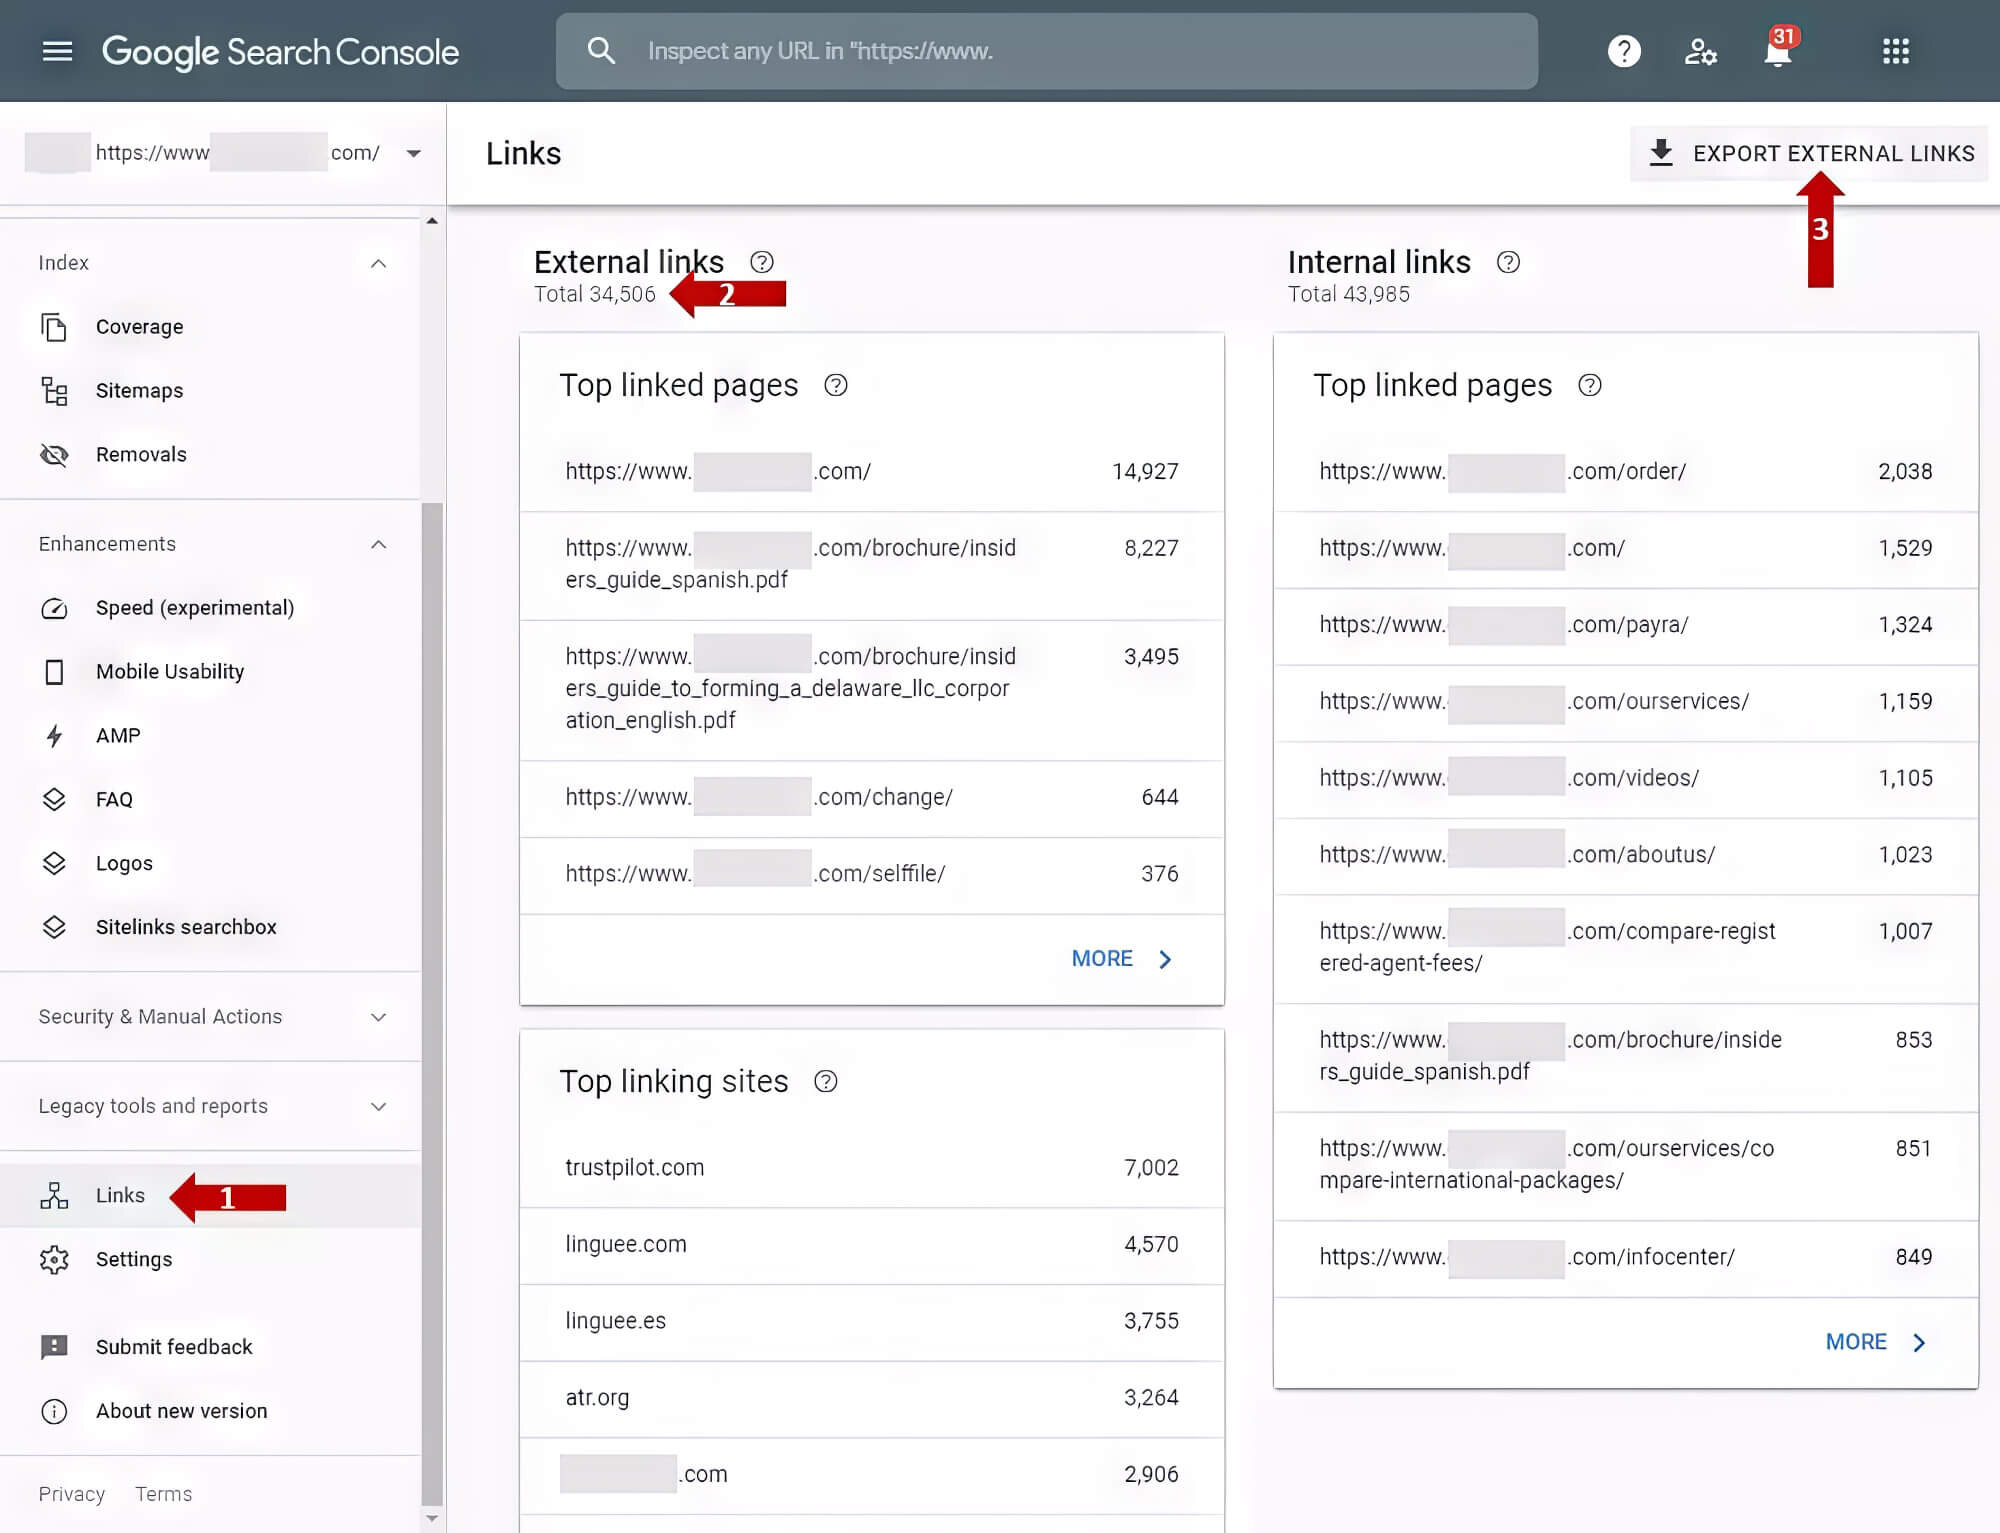
Google Search Console gives you insights into the linking sites that link back to your pages the most. Additionally, you can view the top linked pages on your websites with the console. You can access the list of top-linked pages by clicking “Links” on the left sidebar.
Knowing how your valid pages are being linked on the internet and how you use other websites, i.e., external and internal links, can be quite helpful. It lets you gauge the kind of content that the site’s search results in Google prioritise.
9. Manual Actions
Structured data is part of Google’s webmaster quality guidelines, which every website should comply with. The purpose of this guideline is to prevent useless, fraudulent, or spam-like content from flooding the search results pages.
Some of the best practices include the following:
- The content of your website must be helpful, informative, and reliable
- Use plenty of words that users would search for in the content body, title, and headings
- Enable link crawling to help Google find other pages on your site
- promote your website in Google News and relevant communities and tell Google in relevant communities and among like-minded people
- Follow guidelines specific to the content type (such, images, videos, etc.)
- Use measures to control your content and opt out from search results, if necessary
10. Mobile Usability
There is a high chance that web page visitors are viewing it on a mobile device. Mobile usability becomes an important point to consider when optimising your website.
In the Search Console, you can find a list of points that Google considers best practices. These criteria include text size, distance between clickable elements, viewport settings, and website errors.
It’s important to address mobile usability issues quickly, particularly since the mobile user base is increasing rapidly. If left unattended, it can cause your search results rankings to plummet drastically.
11. Crawl Stats
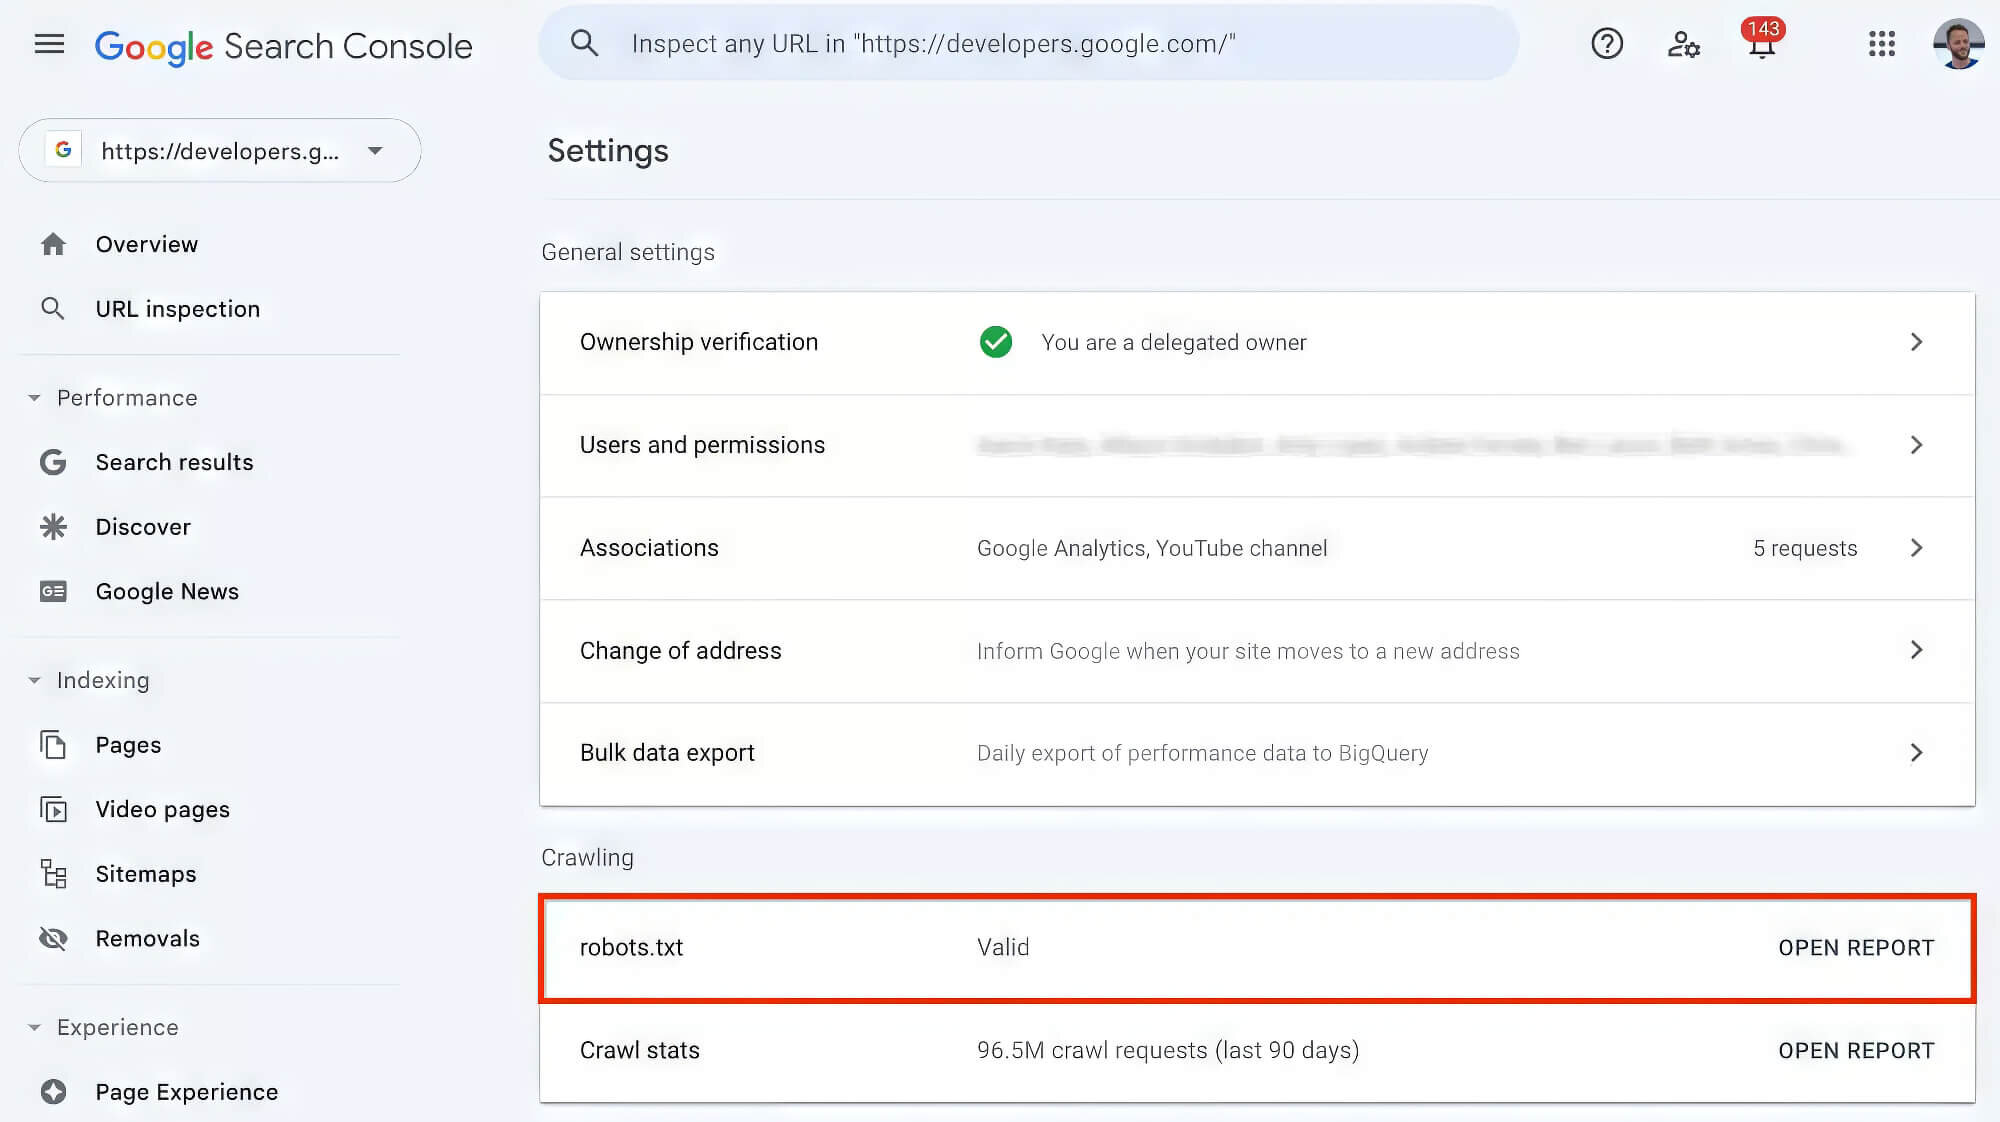
You can view the frequency of Google crawls on your website in the “Crawl Stats” option in the “Settings” tab. This can help you understand how much data is downloaded from your website and its download speed.
Note that the exact frequency of crawling is less important than a sudden increase or dip in crawl rates. Should the crawl rate of your website spike too quickly, you can try the following:
- Adjust the robots.txt file to prevent crawling on certain pages
- Use Google Search Console to set a crawl rate limit, preferably for a short period
- Prevent crawling on pages with infinite results through robots.txt or the nofollow tag
- Use the appropriate error codes for missing, down or moved URLs
If your website has a crawl rate that is lower than expected, you can try updating its sitemap and unblocking pages through the robots.txt file.
12. URL Inspection Tool
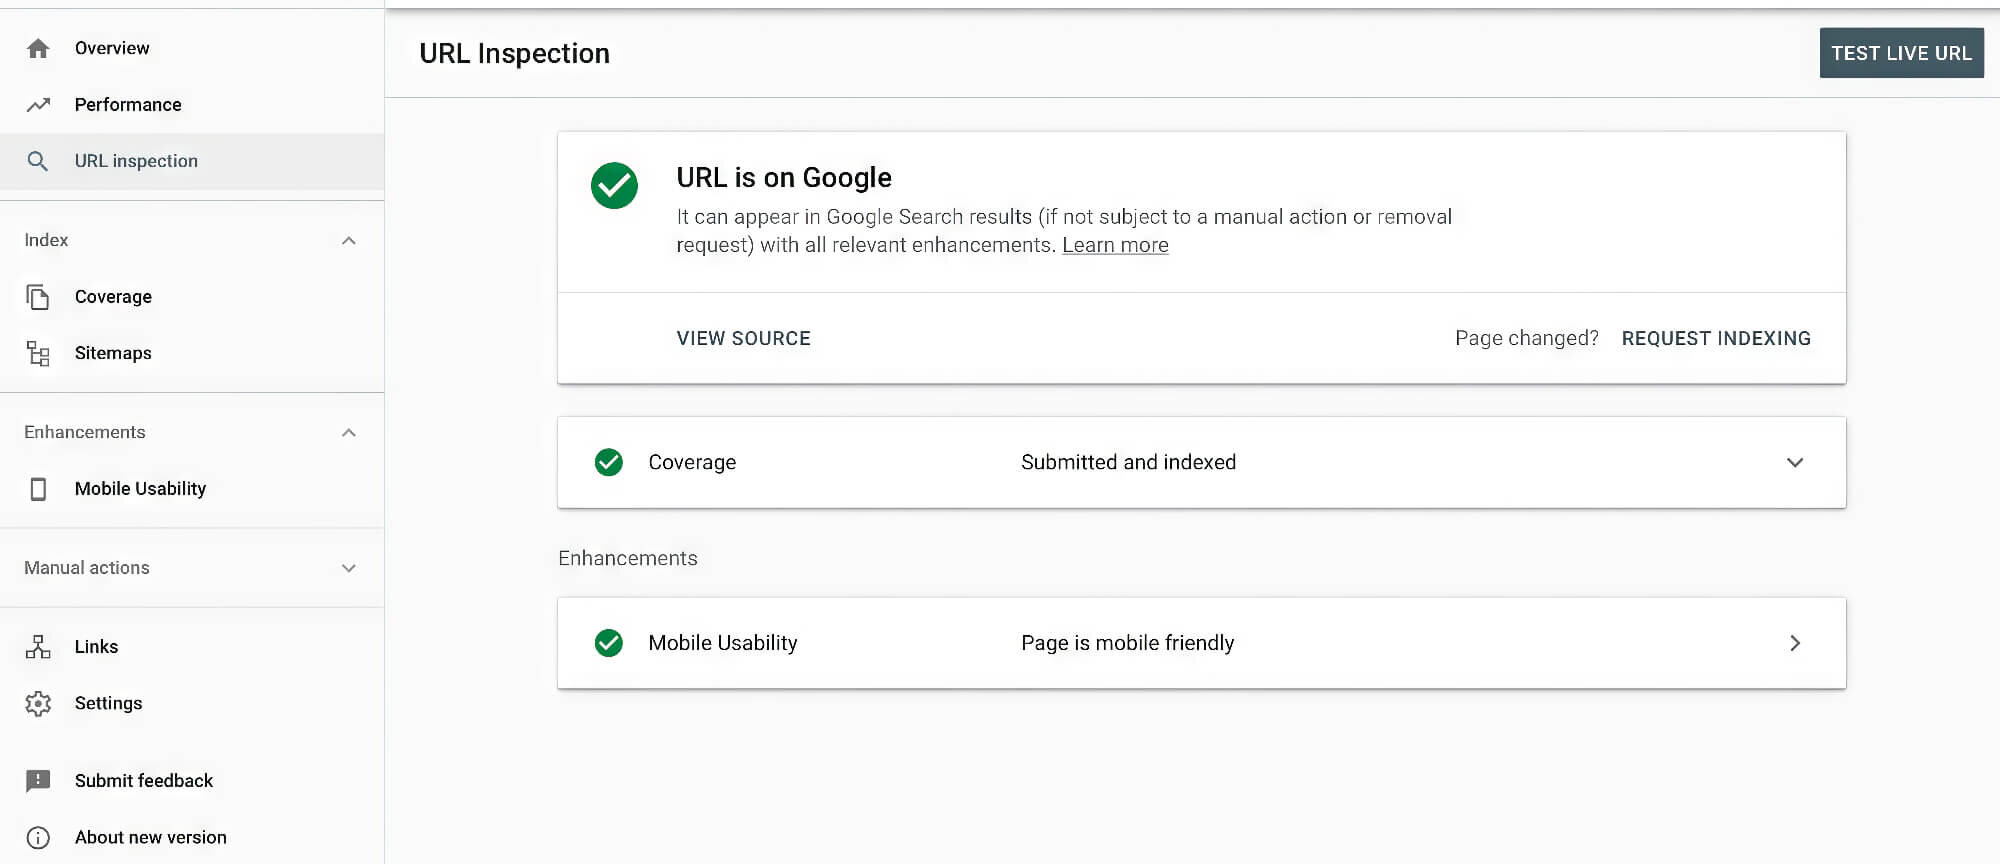
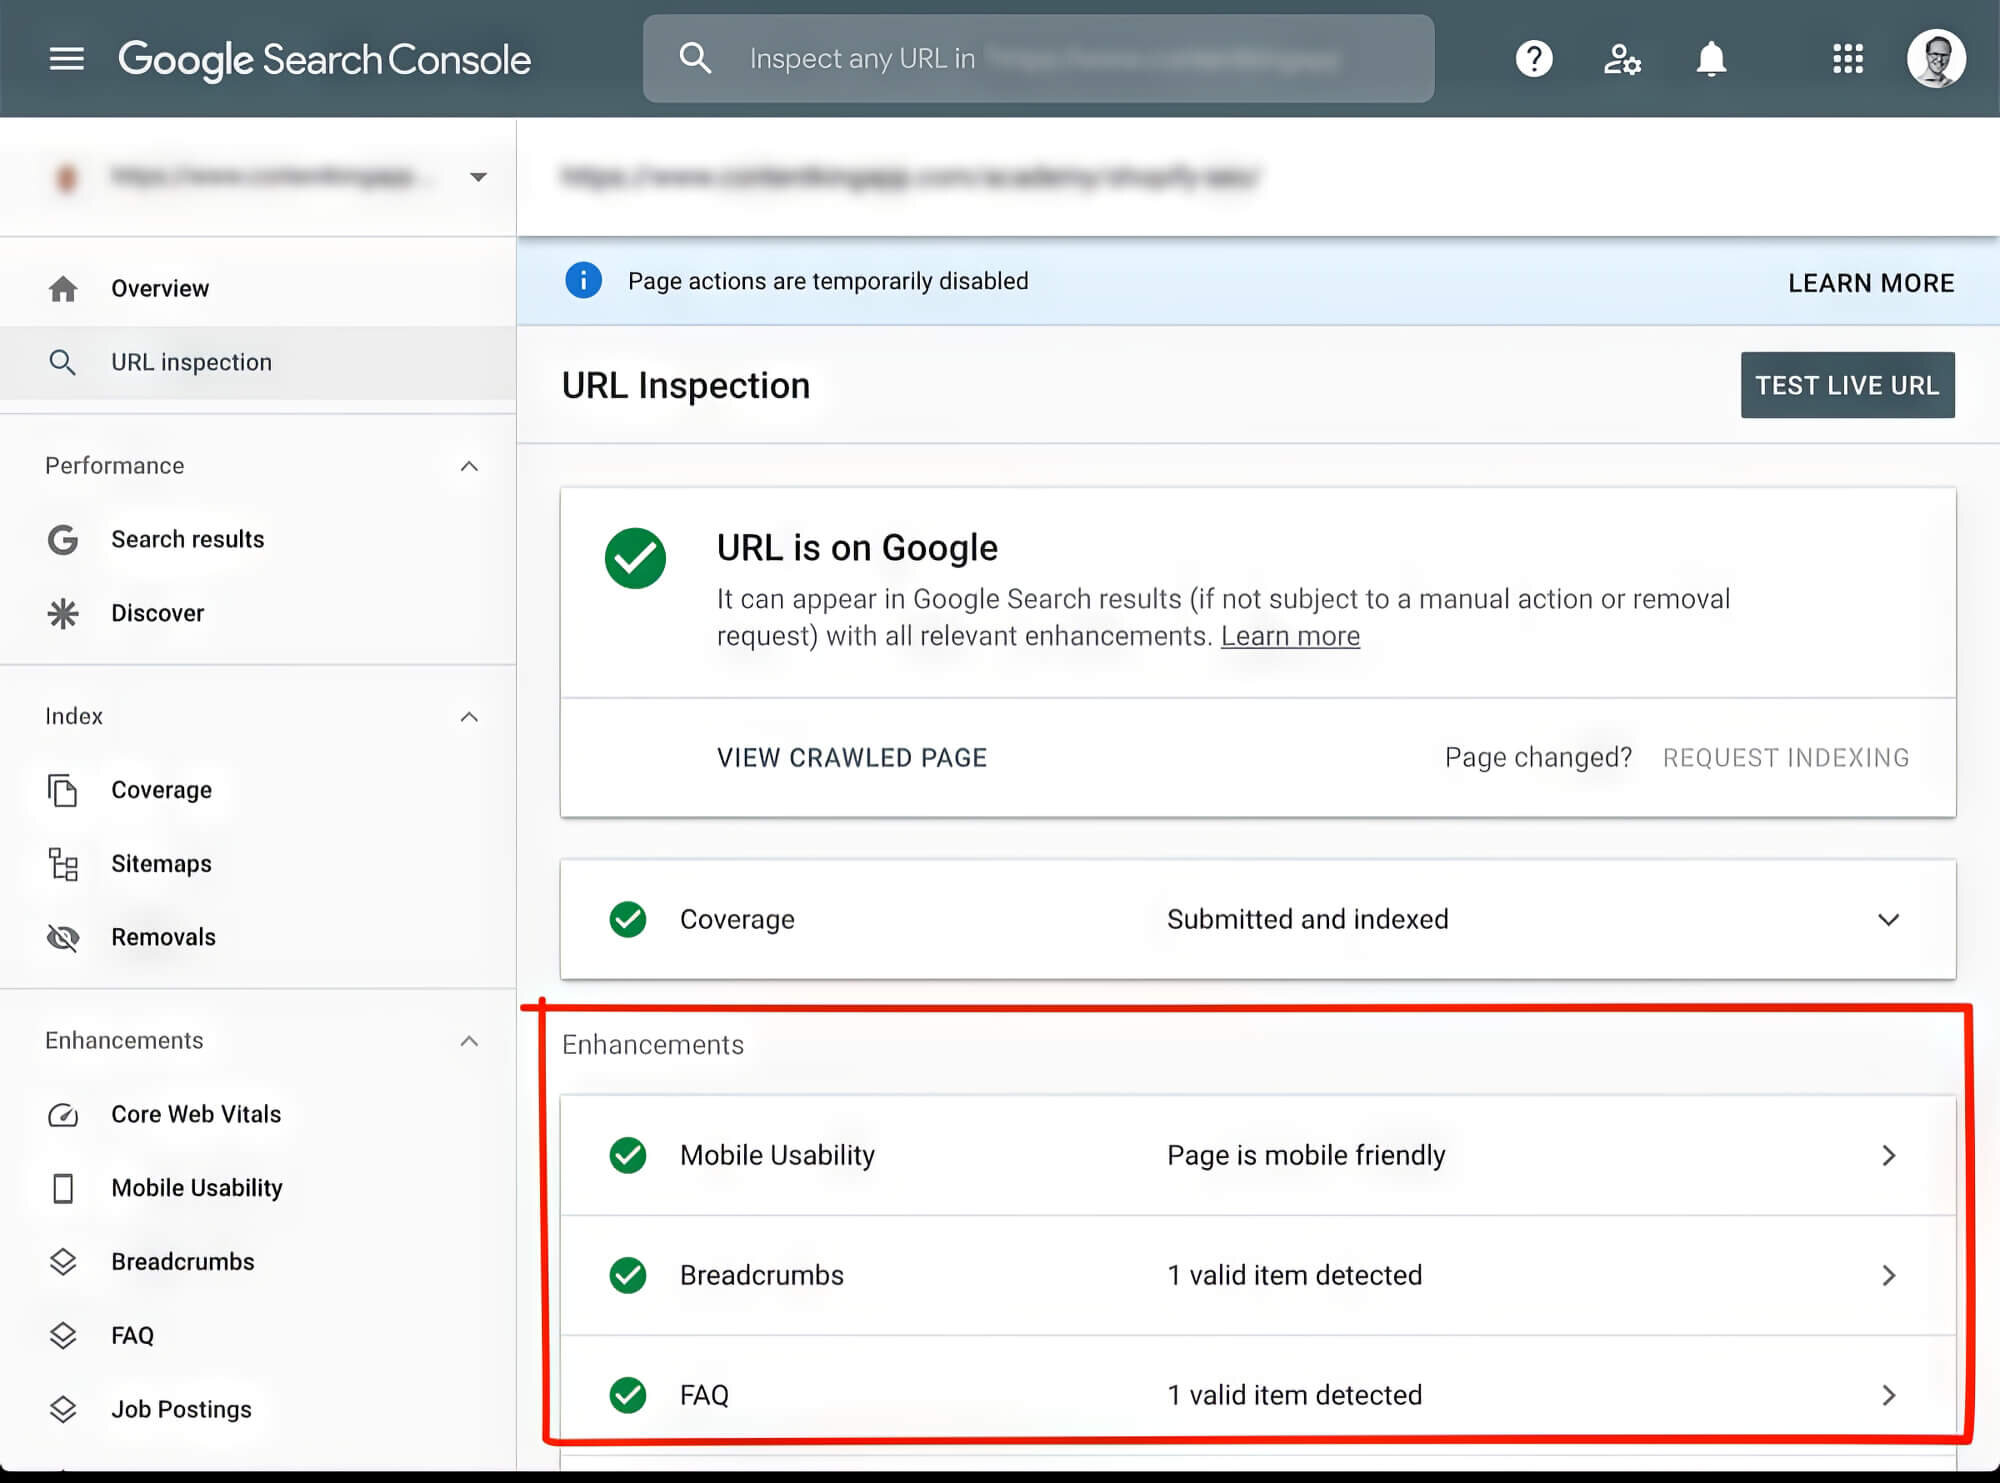
The URL inspection tool allows you to test Google’s crawling and rendering capacity on a particular URL on the site. This helps ascertain that Googlebot can crawl on a page, something that may only have been clear with the test.
A successful test will yield a perfectly loaded page, indicating which resources are left inaccessible to the bot. You can access the website code and any web page errors through “View Tested Page. "
This can be a highly useful tool at the debugging stage of web development.
13. Robots.txt Tester
Robots.txt is a useful text file, but it can be difficult to be sure whether the crawl block works as intended. For this purpose, you can use the robots.txt Tester to ensure a site or its elements don’t appear when accessing the site.
Testing will provide you with an “Accepted” or “Blocked” message, following which you can make adjustments as necessary.
14. URL Parameters
URL parameters can be used in the tracking template of ads or custom parameters for information about a click via a website URL. There are primarily two kinds of parameters: content-modifying and tracking parameters.
Content-modifying parameters transmit information directly to the landing page and must only be set in the final URL. On the other hand, tracking parameters pass information about clicks to the site owners’ account, ad group or campaign in the template.
Note that this tool must be used carefully, as improper settings can negatively impact your website’s crawl rate.
Optimising The Website For Better Rankings
Optimisation is one of the most important steps of any marketing strategy, and Google Search Console helps you optimise your website effectively.
Primarily, you will be relying on three strategies to ensure your website receives the search traffic it deserves. Let’s explore them in detail.
1. Optimise Underperforming Results
If you have been working on a website’s content for a while, you may have noticed that certain pages need to be revised. This can be the case even with an abundance of keywords.
What you need to do is to identify the keywords with high visibility but low click-through rates. This indicates that users see these keywords in the search results but don’t feel compelled enough to visit the website.
The key here is to improve your SERP presence and increase the click-through rate as a result. You can do so by following these steps:
Step 1: Run A Report
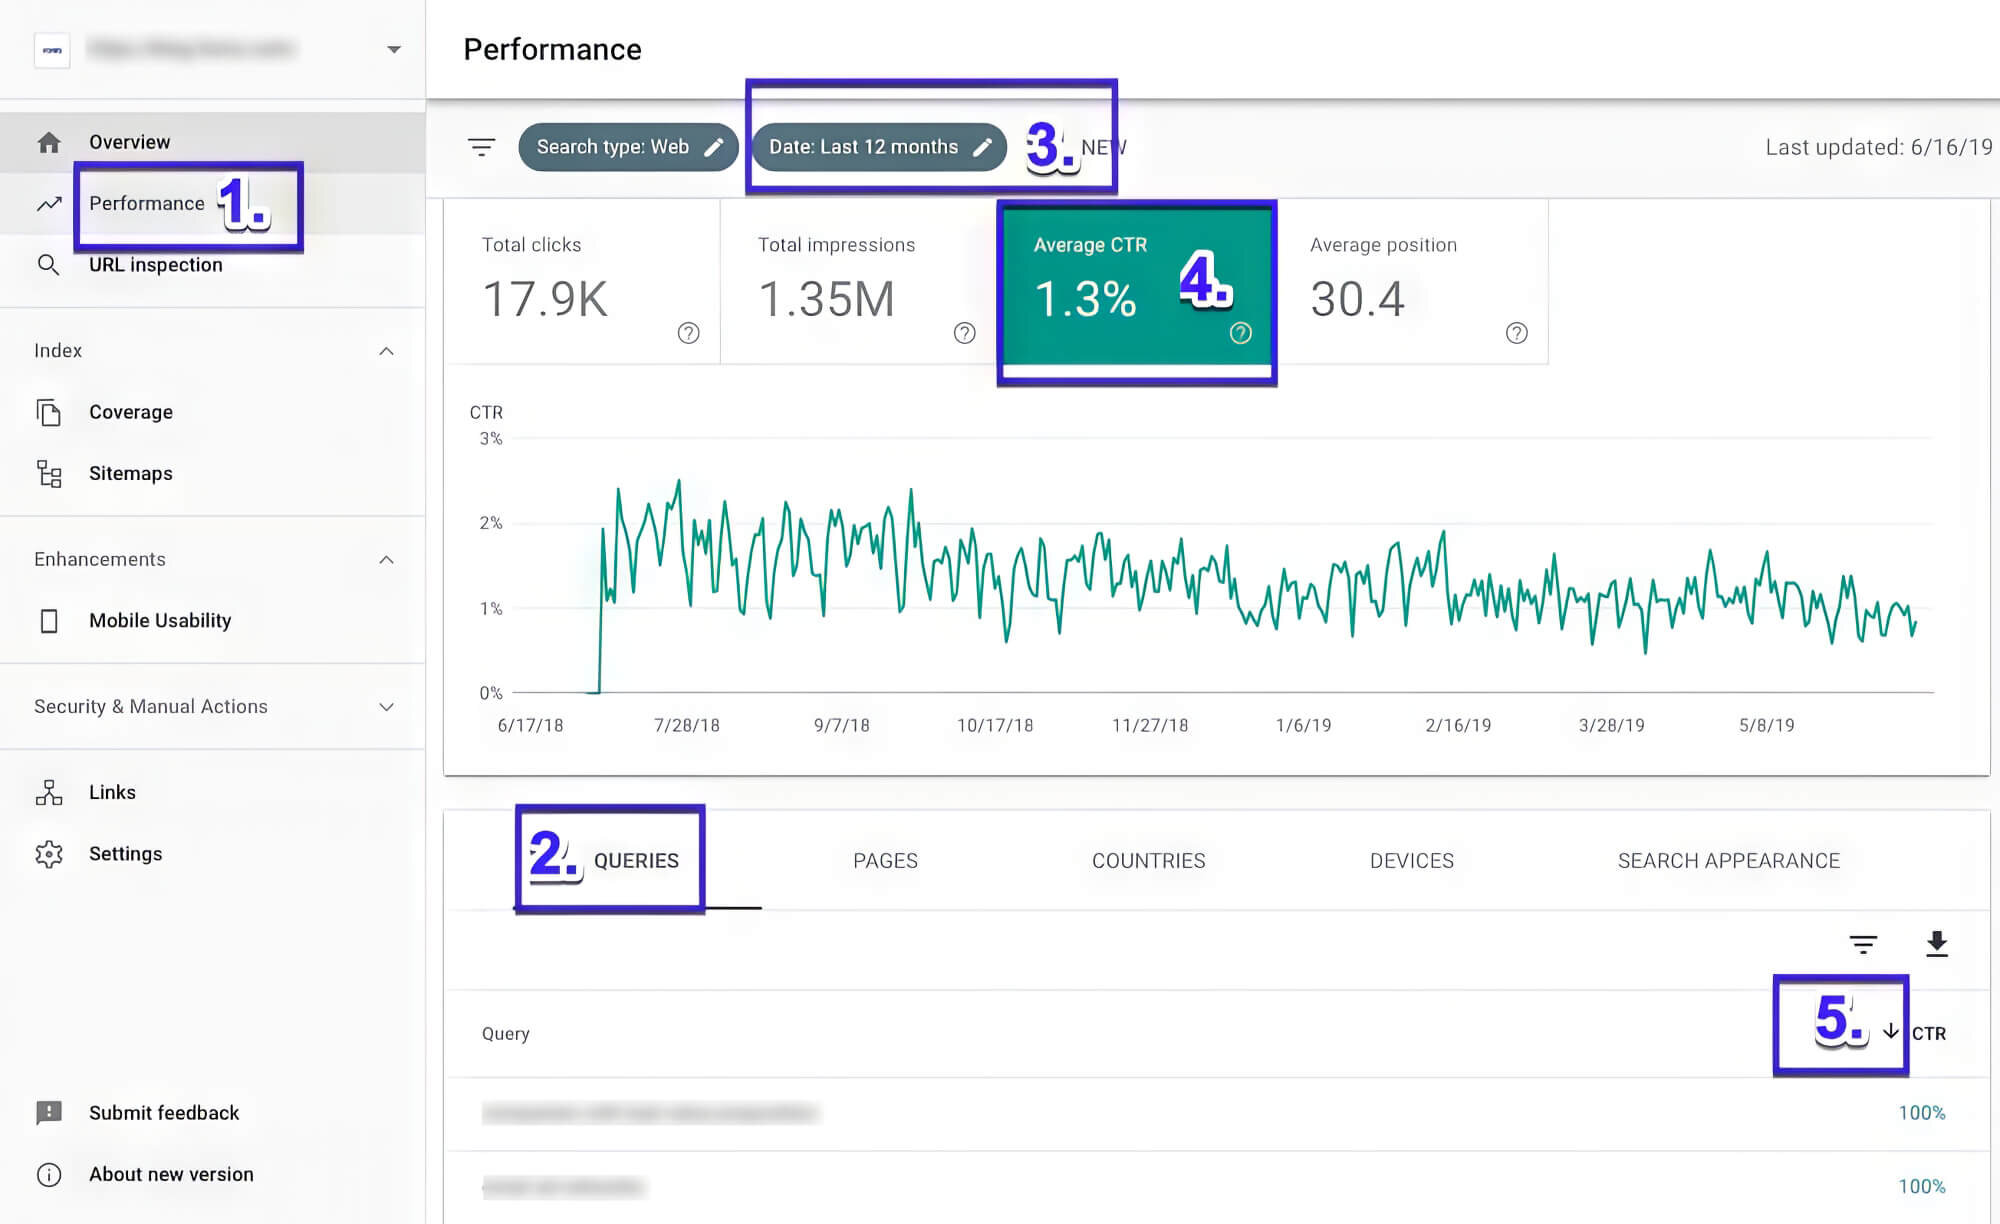
Start by running Google Search Console reports and enabling all the filters available to them: total clicks, total impressions, average click-through rate (CTR), and average position. Here, you will find several parameter tabs that you can use to narrow down the Google Search Console data even further.
Step 2: Gauge The Keyword Performance
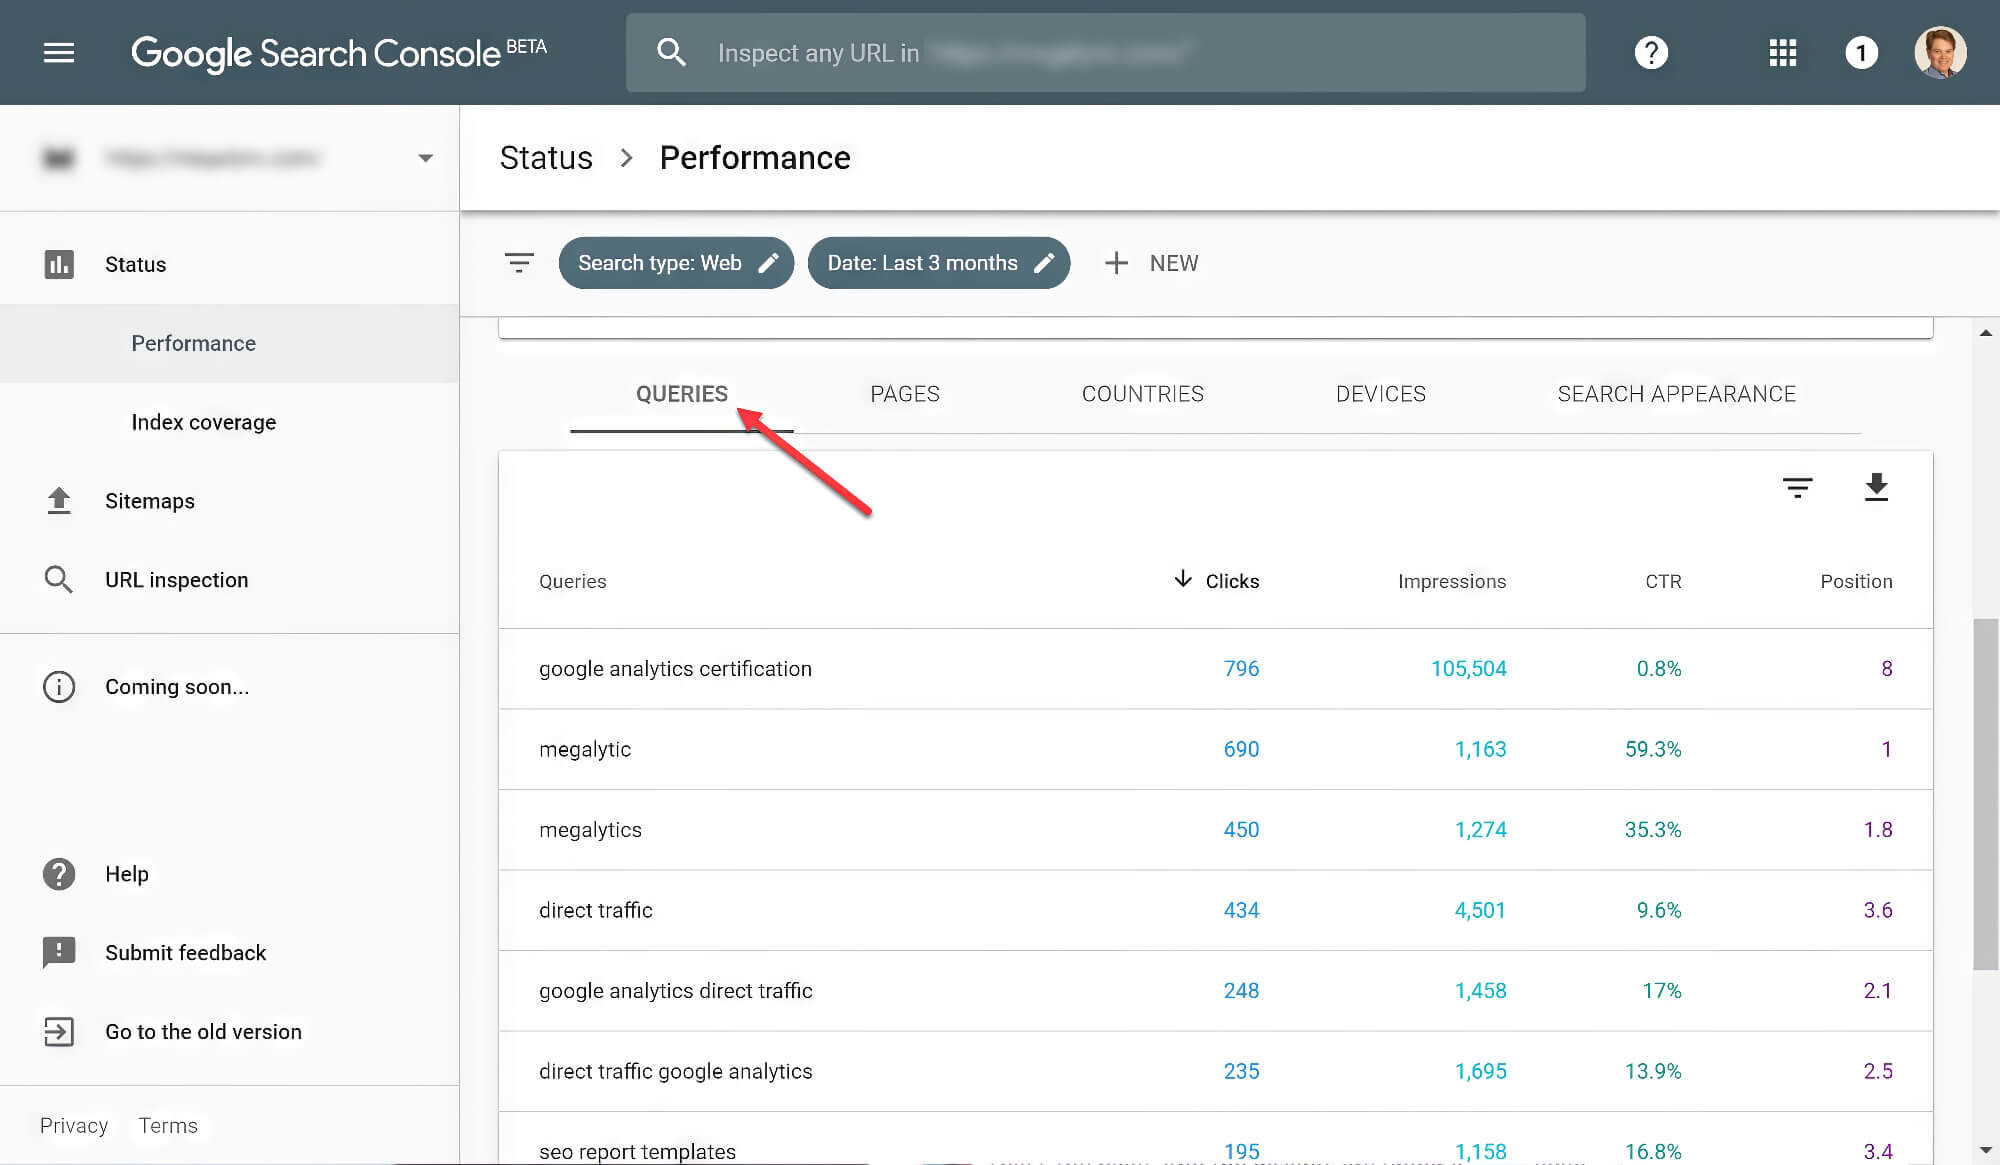
Select the “Queries” tab from the tabs to view the keywords list with the filters applied to them. The keyword data listed here will give you valuable insights into how well each keyword performs in terms of impressions, clicks and CTR.
Step 3: Track The Underperforming Keywords
Next, narrow the number of keywords to five or ten with high visibility but low CTR. Feel free to copy them to a text file or spreadsheet to keep track of them more effectively.
Step 4: Analyse The Performance Of Underperforming Keywords
Now, you can analyse how competitors use these keywords through a Google search. It’s essential to identify why these keywords are underperforming for your site as opposed to the relative success of your competitors.
The most common causes of specific keywords’ underperformance are poorly created meta descriptions and poor title tags. To improve the quality of these elements, consider making them more compelling while still being SEO-friendly. For meta descriptions specifically, you must create a succinct description while inspiring curiosity within readers.
By doing so, your website may see an uptick in search traffic. Continue to optimise your website to improve its performance even further.
2. Perform Mobile Keywords Research
Mobile keyword research is another important aspect of Search Engine Optimisation that Google Search Console addresses directly. With the growing number of mobile devices, it’s essential to use the keywords with the highest CTR in your content.
Access the Performance Search Results report, and instead of clicking on the “Queries” tab, select the “Devices” option instead. Here, you will be given three options: Desktop, Mobile and Tablet.
Select Mobile to find all the common keywords in mobile user searches. Simply add these to your content to boost the website’s ability to rank higher in SERP rankings and adjust your content marketing strategy accordingly.
3. Find And Rectify Performance Issues
Find and fix performance drops by utilising Google Search Console to identify what needs attention on your website.
Typically, the console displays issues within a viewable window of up to 16 months, but that timeframe may need to be bigger. To address this, access a date range by clicking on the “Date: Last 3 months” bubble.
You will have the option to choose the time range manually or from a predefined range, such as the last 7 days, the last 28 days, etc. Additionally, you can hit the “Compare” tab to compare your website’s performance in the specified time range.
After clicking “Apply”, you will have a wide variety of data displayed, with plenty of interactive elements that help you understand it better. You can view the number of clicks, impressions, CTR, and position and how they have changed over time, allowing you to address any potential issues.
Fix issues and optimise indexing.
Google Search Console lets you spot indexing errors and offers tools to fix them efficiently. It’s like having a supportive guide by your side as you fine-tune your site.
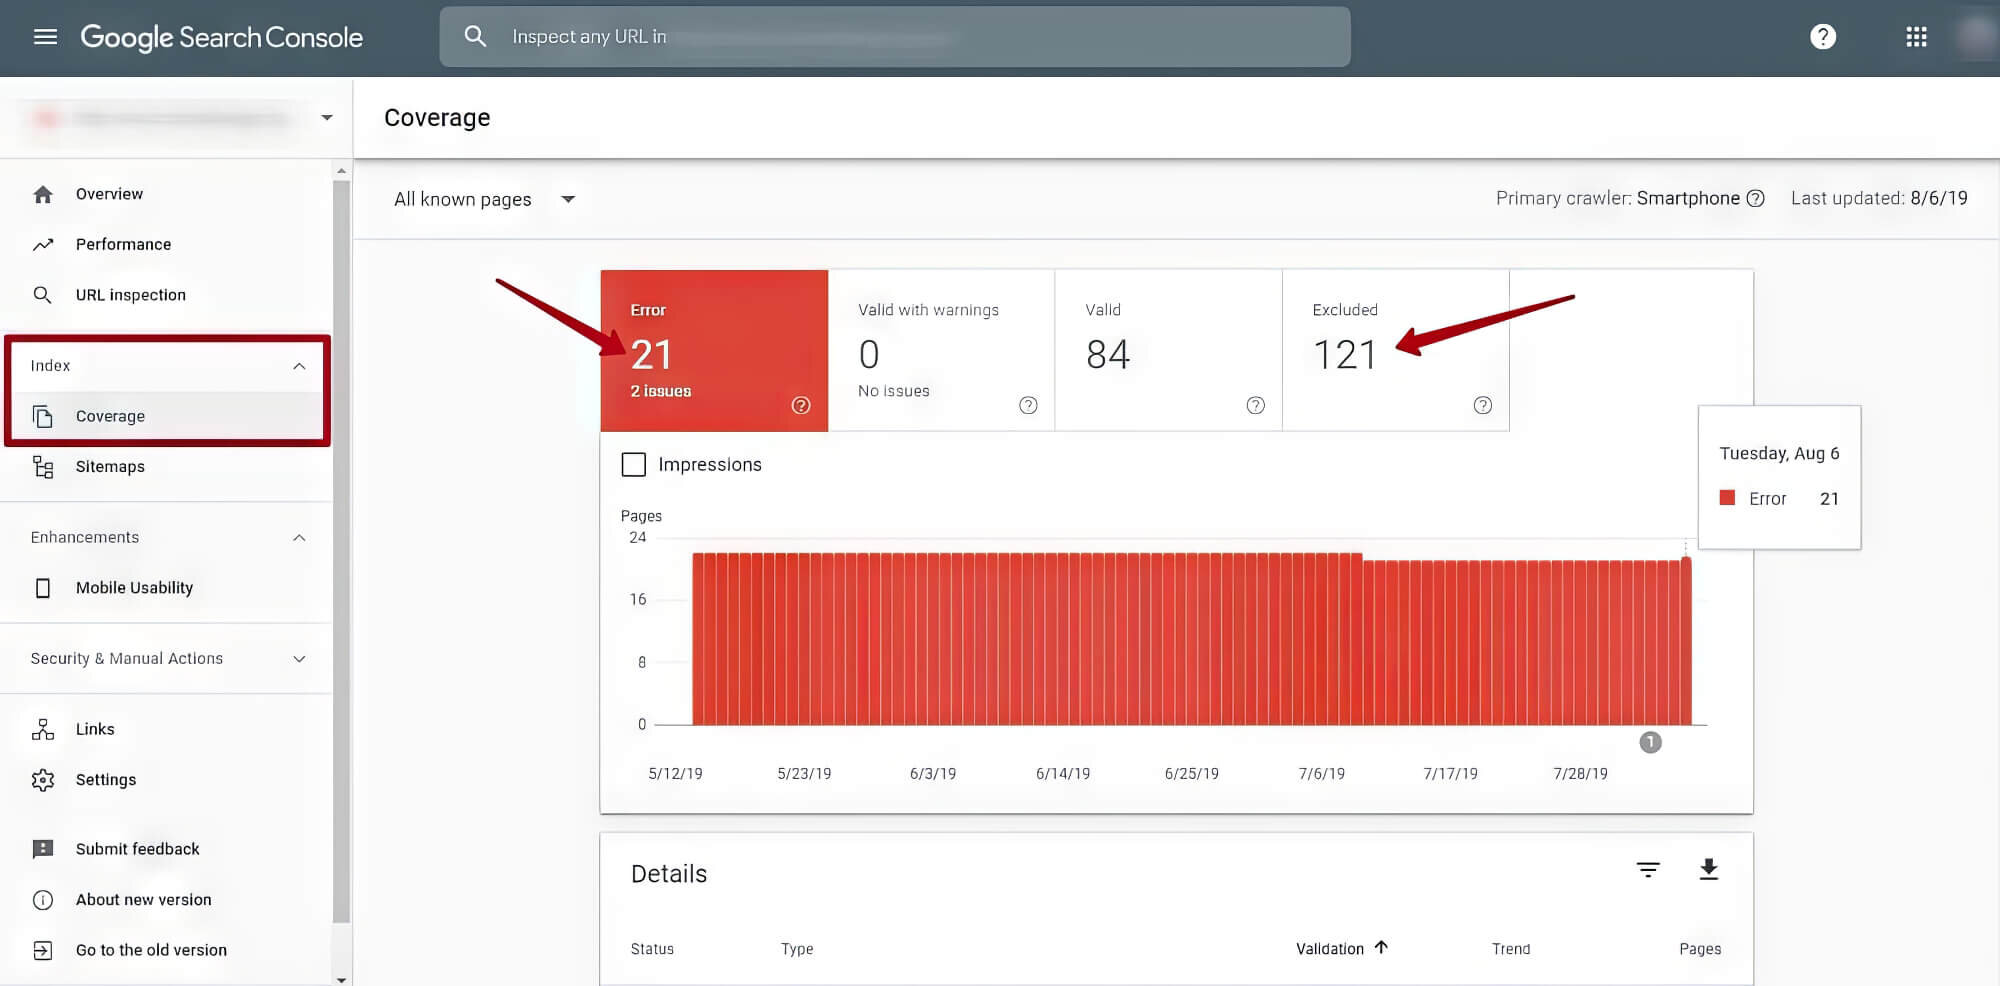
This can be done through the “Index Coverage Report,” which shows a list of successfully indexed pages. In addition, it displays those that haven’t been indexed due to an error.
To access the list of indexing errors, open the Index Coverage Report and click on the “Error” tab. Ensuring that no other tab is highlighted, scroll down to view the details.
In the details section, you will find a list of errors, the validation status, the trend, and the number of affected pages segregated by each error. You can expand this further to view a specific URL and the last time Googlebot crawled it.
Here’s a list of some of the possible errors that can cause indexing issues:
- Redirect error
- Server error (5xx)
- The submitted URL seems to be a Soft 404
- Submitted URL marked “noindex”
- Submitted URL returns unauthorised request (401)
- Submitted URL has a crawl issue
- Submitted URL blocked by robots.txt
- Submitted URL not found (404)
If you ever encounter these errors, you can try a few quick fixes to address them. Each error has a different fix, as detailed in the following sections.
1. Fixing “Submitted URL Not Found” Error
Typically, the “Submitted URL not found (404)” errors are fairly straightforward to fix as they are generally false flags. As such, you can begin by checking whether the particular URL is accessible or not.
First, expand the error details as mentioned earlier and hit the “Inspect URL” option. This prompts the Search Console to ask Google Index to provide you with data on the URL. While Google Index produces a result, you can open the URL in a separate window to see if it is accessible normally.
Two possibilities may arise: either the URL is accessible normally, and the error is a false alarm, or the URL is inaccessible.
If the URL is typically accessible but marked with a 404 error, you can manually add it to the Google Index. To do so, click the “Test Live URL” button and hit the “Request Indexing.” After this, simply validate the fix to add the URL to the Index.
But if the URL returns a 404 error on your browser window, you can approach the issue in two ways. On the one hand, you may leave it as is and have Google remove it from the Index once sufficient time has passed. Conversely, you can use a 301 redirection on the page to redirect potential users to a different page on your website.
2. Fixing “Server Error (5xx)” Error
This error occurs when Googlebot is unable to access the website for some reason. Typically, this is due to the server being down or unavailable for the moment.
These types of errors are usually best reported to Google, but it can be difficult to ignore them if you encounter several in a short time span. In such cases, it’s a good idea to examine how the server functions on your end and find out what is causing the error.
To address the “Server Error (5xx)” indexing issue, highlight one of the URLs displaying this error on the Index Coverage Report. You will see a sidebar open on the right with the options “Inspect URL” and “Test Robots.txt Blocking”.
Click on “Inspect URL” for more details about the error. You may be greeted with the message “URL is not on Google: Indexing Errors”.
This can hint at two outcomes: Google removed the URL from the Index or was unavailable when Googlebot attempted a crawl.
Copy-paste the URL into a new window and check if it is accessible or not. If it usually loads, switch back to the Google Search Console and hit the “Test Live URL” button.
Following this, the tool should be able to load the page and its details. Simply click “Request Indexing” to have the page re-added to the Google Index.
But if the website doesn’t load in a separate browser window, you may have to re-check the error by performing the same steps. You may encounter a different error or return the same one requiring a different fix.
And lastly, if you are unable to solve the error, you may want to add a “noindex” HTML tag in the header to the page. Removing it from your sitemap entirely is best to prevent Google from accessing it repeatedly and producing further errors.
3. Fixing “Submitted URL Seems To Be A Soft 404” Error
A soft 404 error indicates that instead of indicating to the search engines that it has to be ignored, it produced a valid code. This typically applies to web pages accessible only after the user performs specific actions, such as adding items to a shopping cart.
Soft 404 errors can be fixed in no less than four different ways, for which you may:
- Return a 404 code for the error-producing page
- Remove the error-producing page from the sitemap
- Redirect to a different page
- Leave it as is and wait for it to be resolved automatically
These errors are often expected, so leaving them be is a perfectly fine course of action.
4. Fixing “Submitted URL Has Crawl Issue” Error
URLs with crawl issues indicate that something is preventing Google from indexing it. The crux of solving this issue is finding its source and re-adding it to the Google Index.
Find the page returning the error on the Index Coverage Report and click the “Inspect URL” button. You can view the crawled page and examine its details here on the “More Info” tab.
Often, a page with crawl issues is caused by its resources failing to load during an indexing attempt. However, to ascertain that the page elements have no issues loading normally, open the URL in a separate browser window.
If they load well, you can ensure the errors are temporary. Click the “Test Live URL” button to refresh the error report and click “Request Indexing” under More Info to re-add the page to the Index.
You will be notified via email if the indexing efforts were a success or not.
5. Fixing Redirect Errors
Redirect errors result from Googlebot being unable to access the page due to incorrect redirection. Either the redirected page does not exist or doesn’t load properly.
You can fix these errors through the following steps:
- Hit the “Inspect URL” button and expand its details
- Click on the “Test Live URL” button
- Once the error is addressed, hit “Request Indexing.”
- Return to the report and click on “Validate Fix.”
A successful fix will return a “Passed” result in the validation column next to the error report.
Reporting Search Console Errors
Sometimes, you can’t fix specific errors on the Google Search Console on your own. When this happens, you can try to report these issues directly to Google.
Google will provide you with a few troubleshooting steps by clicking on the “Report Domain Verification Issues” or “Report User Management Issues” buttons. Along with these steps, you will be asked to fill an error report in as much detail as you possibly can. This report is sent directly to Google, which may address the issue in the future.
The best way to approach errors with Google Search Console is to look at its help guides and community posts. There is a high chance that someone in the community has faced the issue before and may be able to provide a solution.
Optimise and Monitor Your Site With Google Search Console
Google Search Console is an incredibly powerful and accessible tool that is easy to understand. Despite being easy to use, the SEO tool has a high ceiling, meaning that seasoned professionals can benefit from it for marketing purposes.
In addition to the functionalities listed here, the Search Console allows users with advanced SEO knowledge to perform tasks like uploading link disavow reports. Additionally, thanks to its highly secure nature and easy troubleshooting, the Search Console promotes a healthier way of improving website performance.
Be sure to use this free tool to its maximum potential and reach new heights of website traffic and impressions!

